The Ultimate Guide to the Doodle Grid Method for Murals

As I’m writing this, the sun is shining, the spritzes are spritzing, and I’m gearing up for a summer of murals around the country - many of them outdoors and in fun, warm weather destinations. Since days are brighter and longer in the summertime, I like to finish up a day of painting before dark so that I can make time for all the local oysters, martinis, and summertime revelry I can find (especially when the weather is nice) in any given job destination.
What does that mean for my muraling schedule? That I am not waiting until the sun drops to set up shop. If you’ve read my blogs or seen my content, you know that I love my projector. Even the best projector, however, needs low light to transfer well to any backdrop. Since I want to prioritize painting during the day (summer tourists walking by = easy marketing for Pandr!!) I have to somehow accurately and proportionally transfer my designs onto a wall in full sunlight. And that, my friends, is where the rarely discussed - but highly effective - “doodle grid method” comes into play.
What is the Doodle Grid Method?
So, what is the doodle method? Also referred to as the “squiggle grid” or the “lazy grid” method, the doodle method is a technique that artists use to quickly and effectively grid out their design on a chosen surface without using either a ruler or a projector. Rather than measuring out a precise grid or tracing a projected shape, the doodle method consists of shapes, letters, numbers, and other designs drawn onto a wall or canvas at random. These “doodles” then act as an anchor, creating reference points for the art, ensuring that the final product turns out well scaled, proportional, and basically exactly as envisioned.
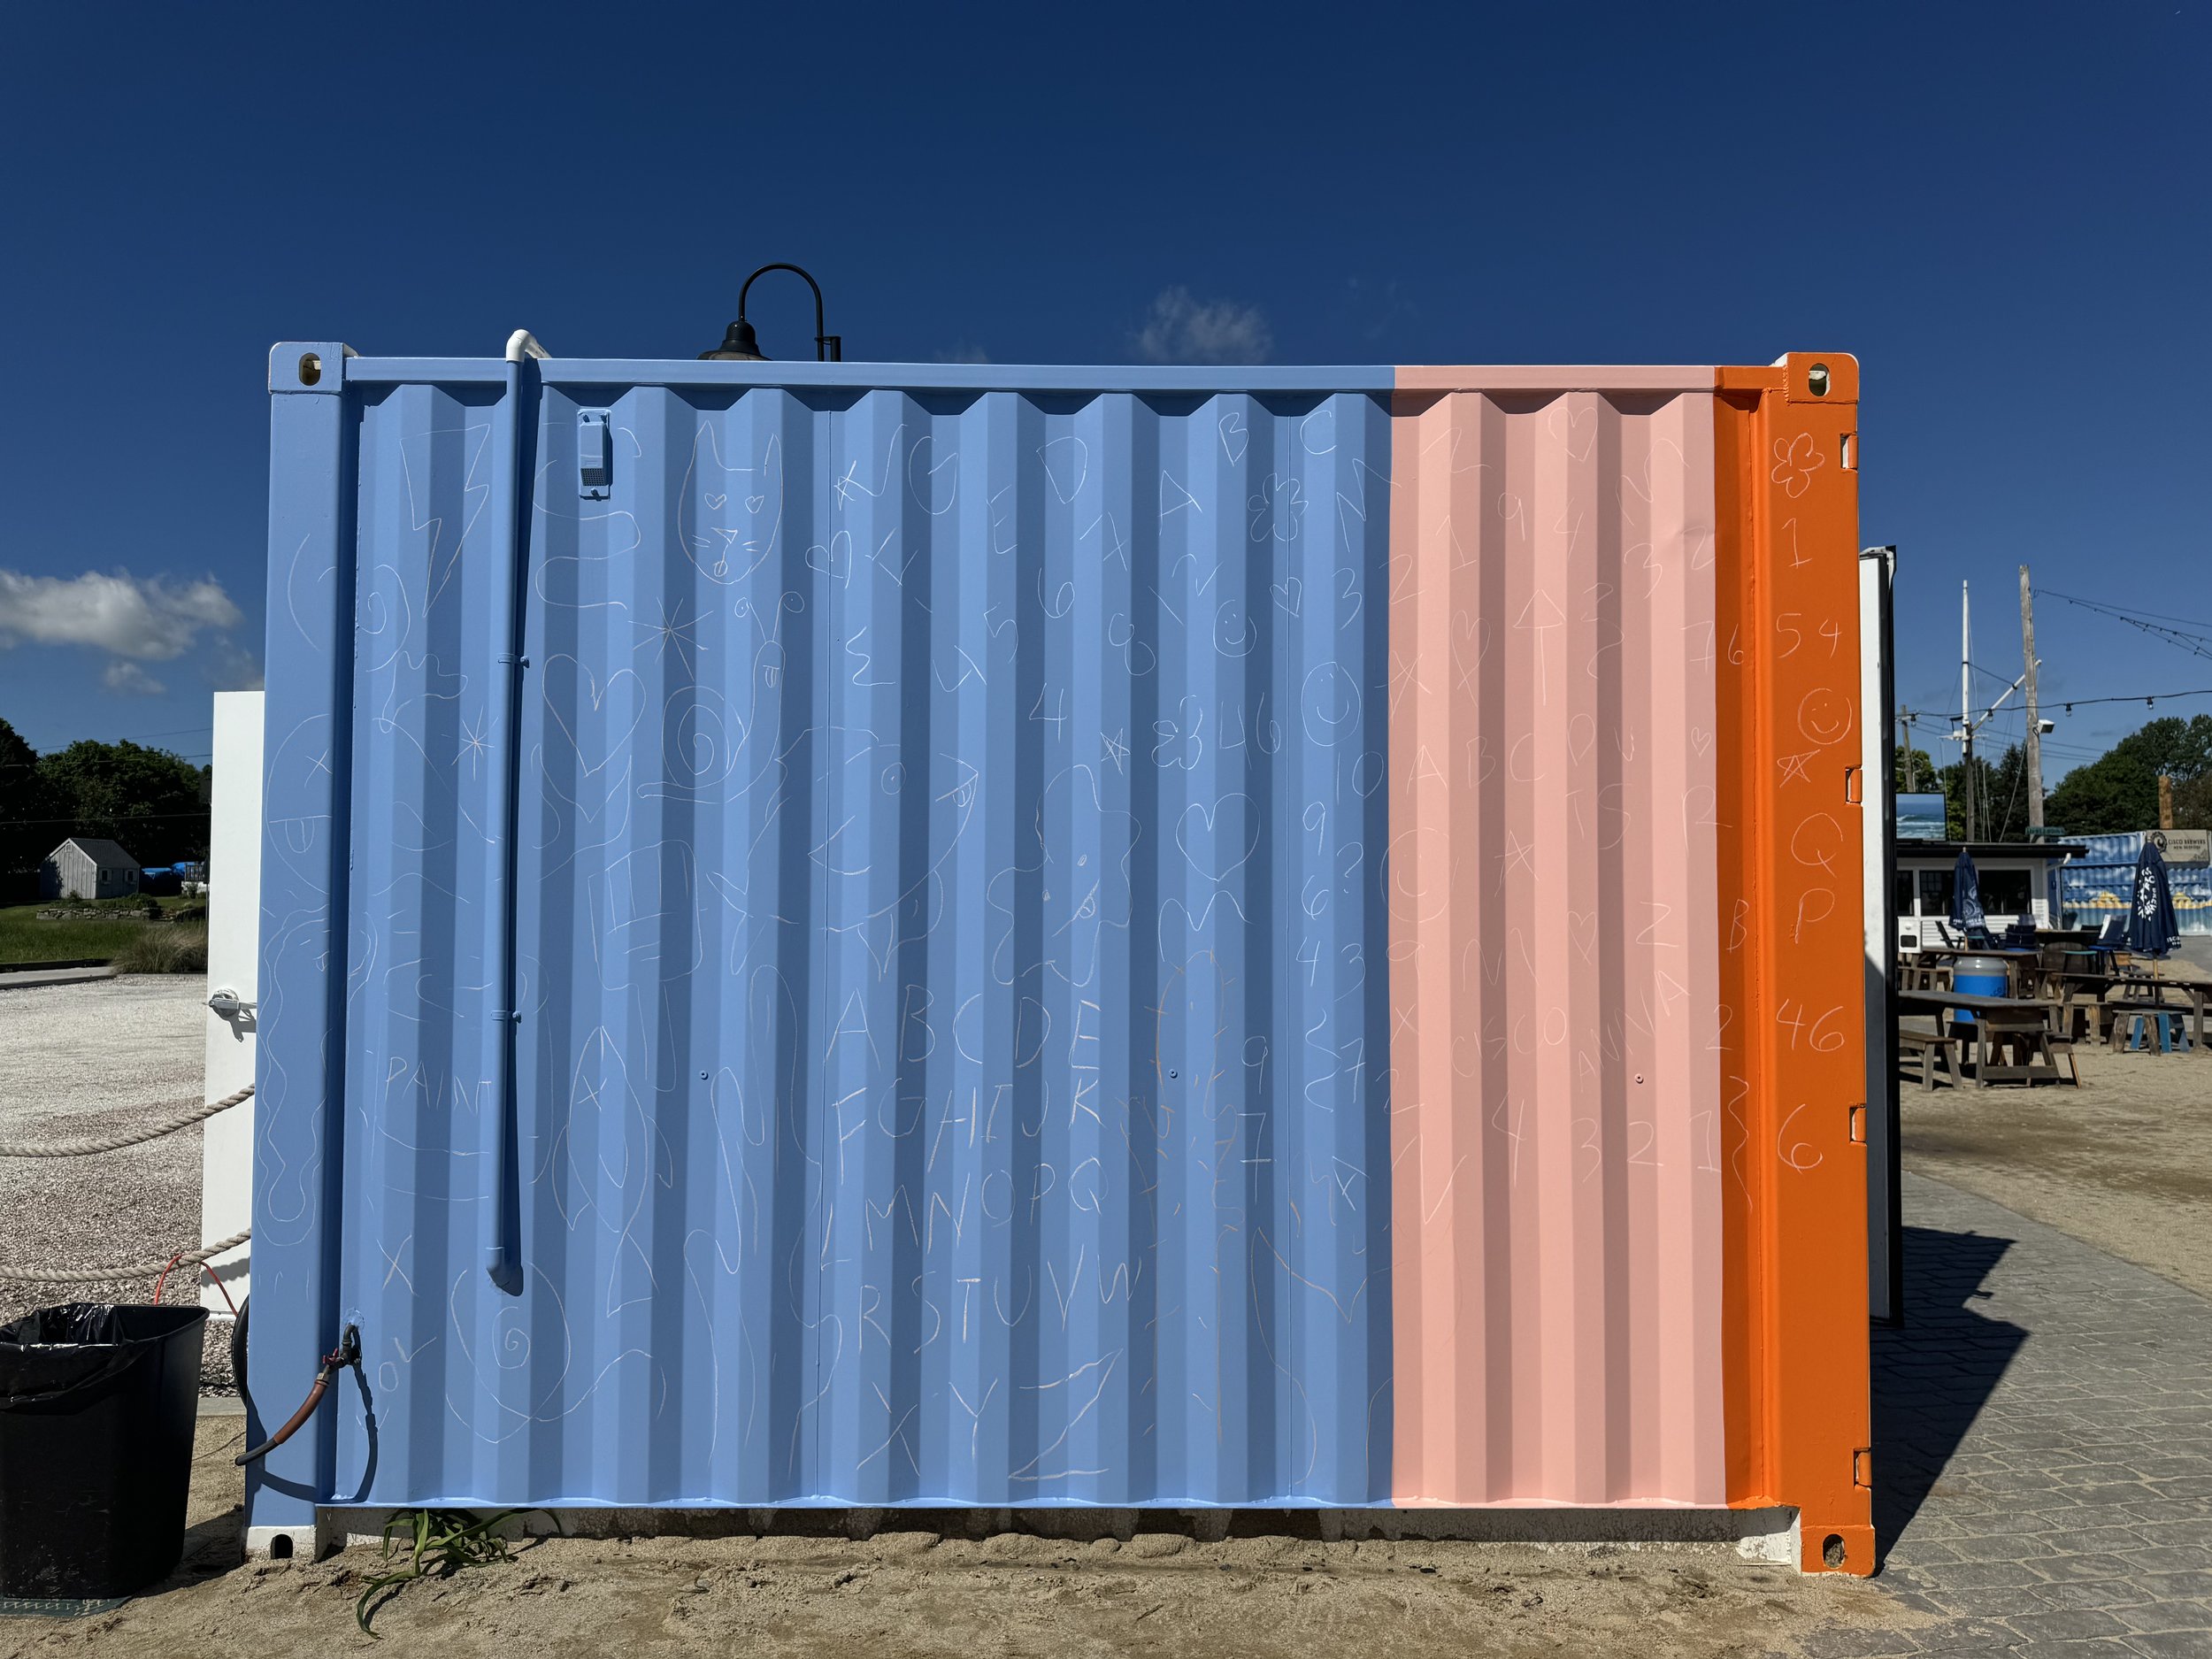
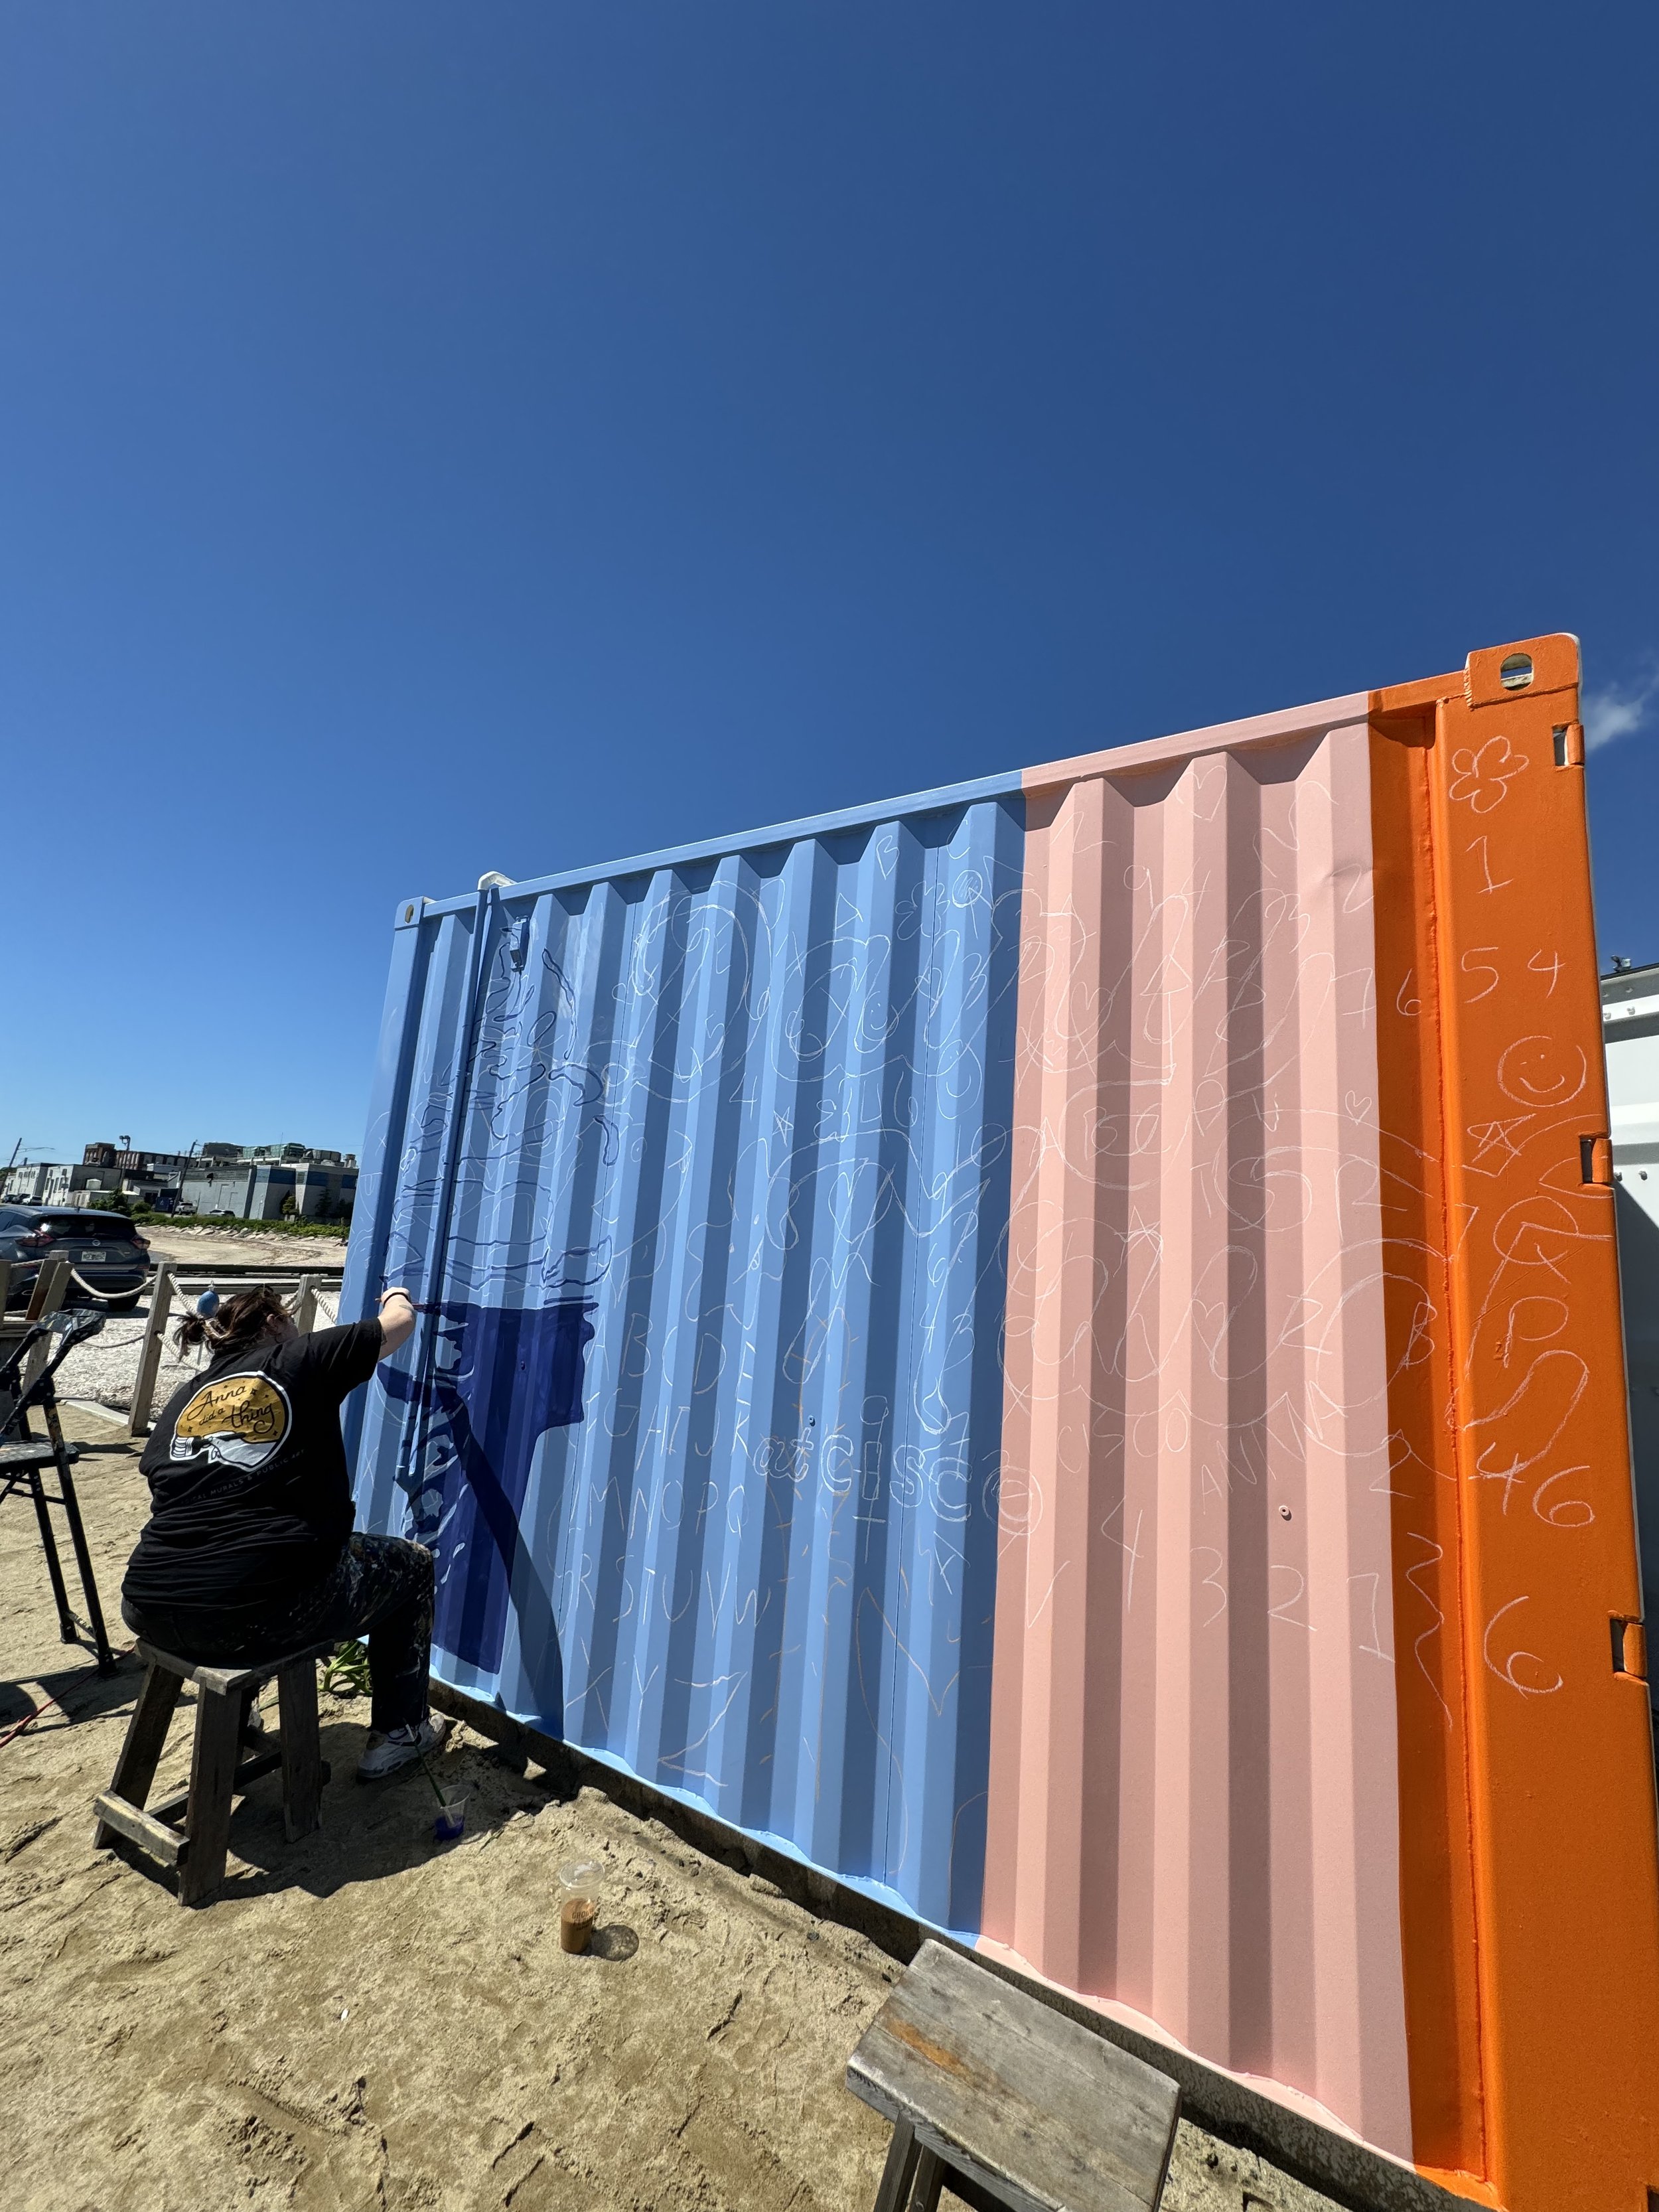
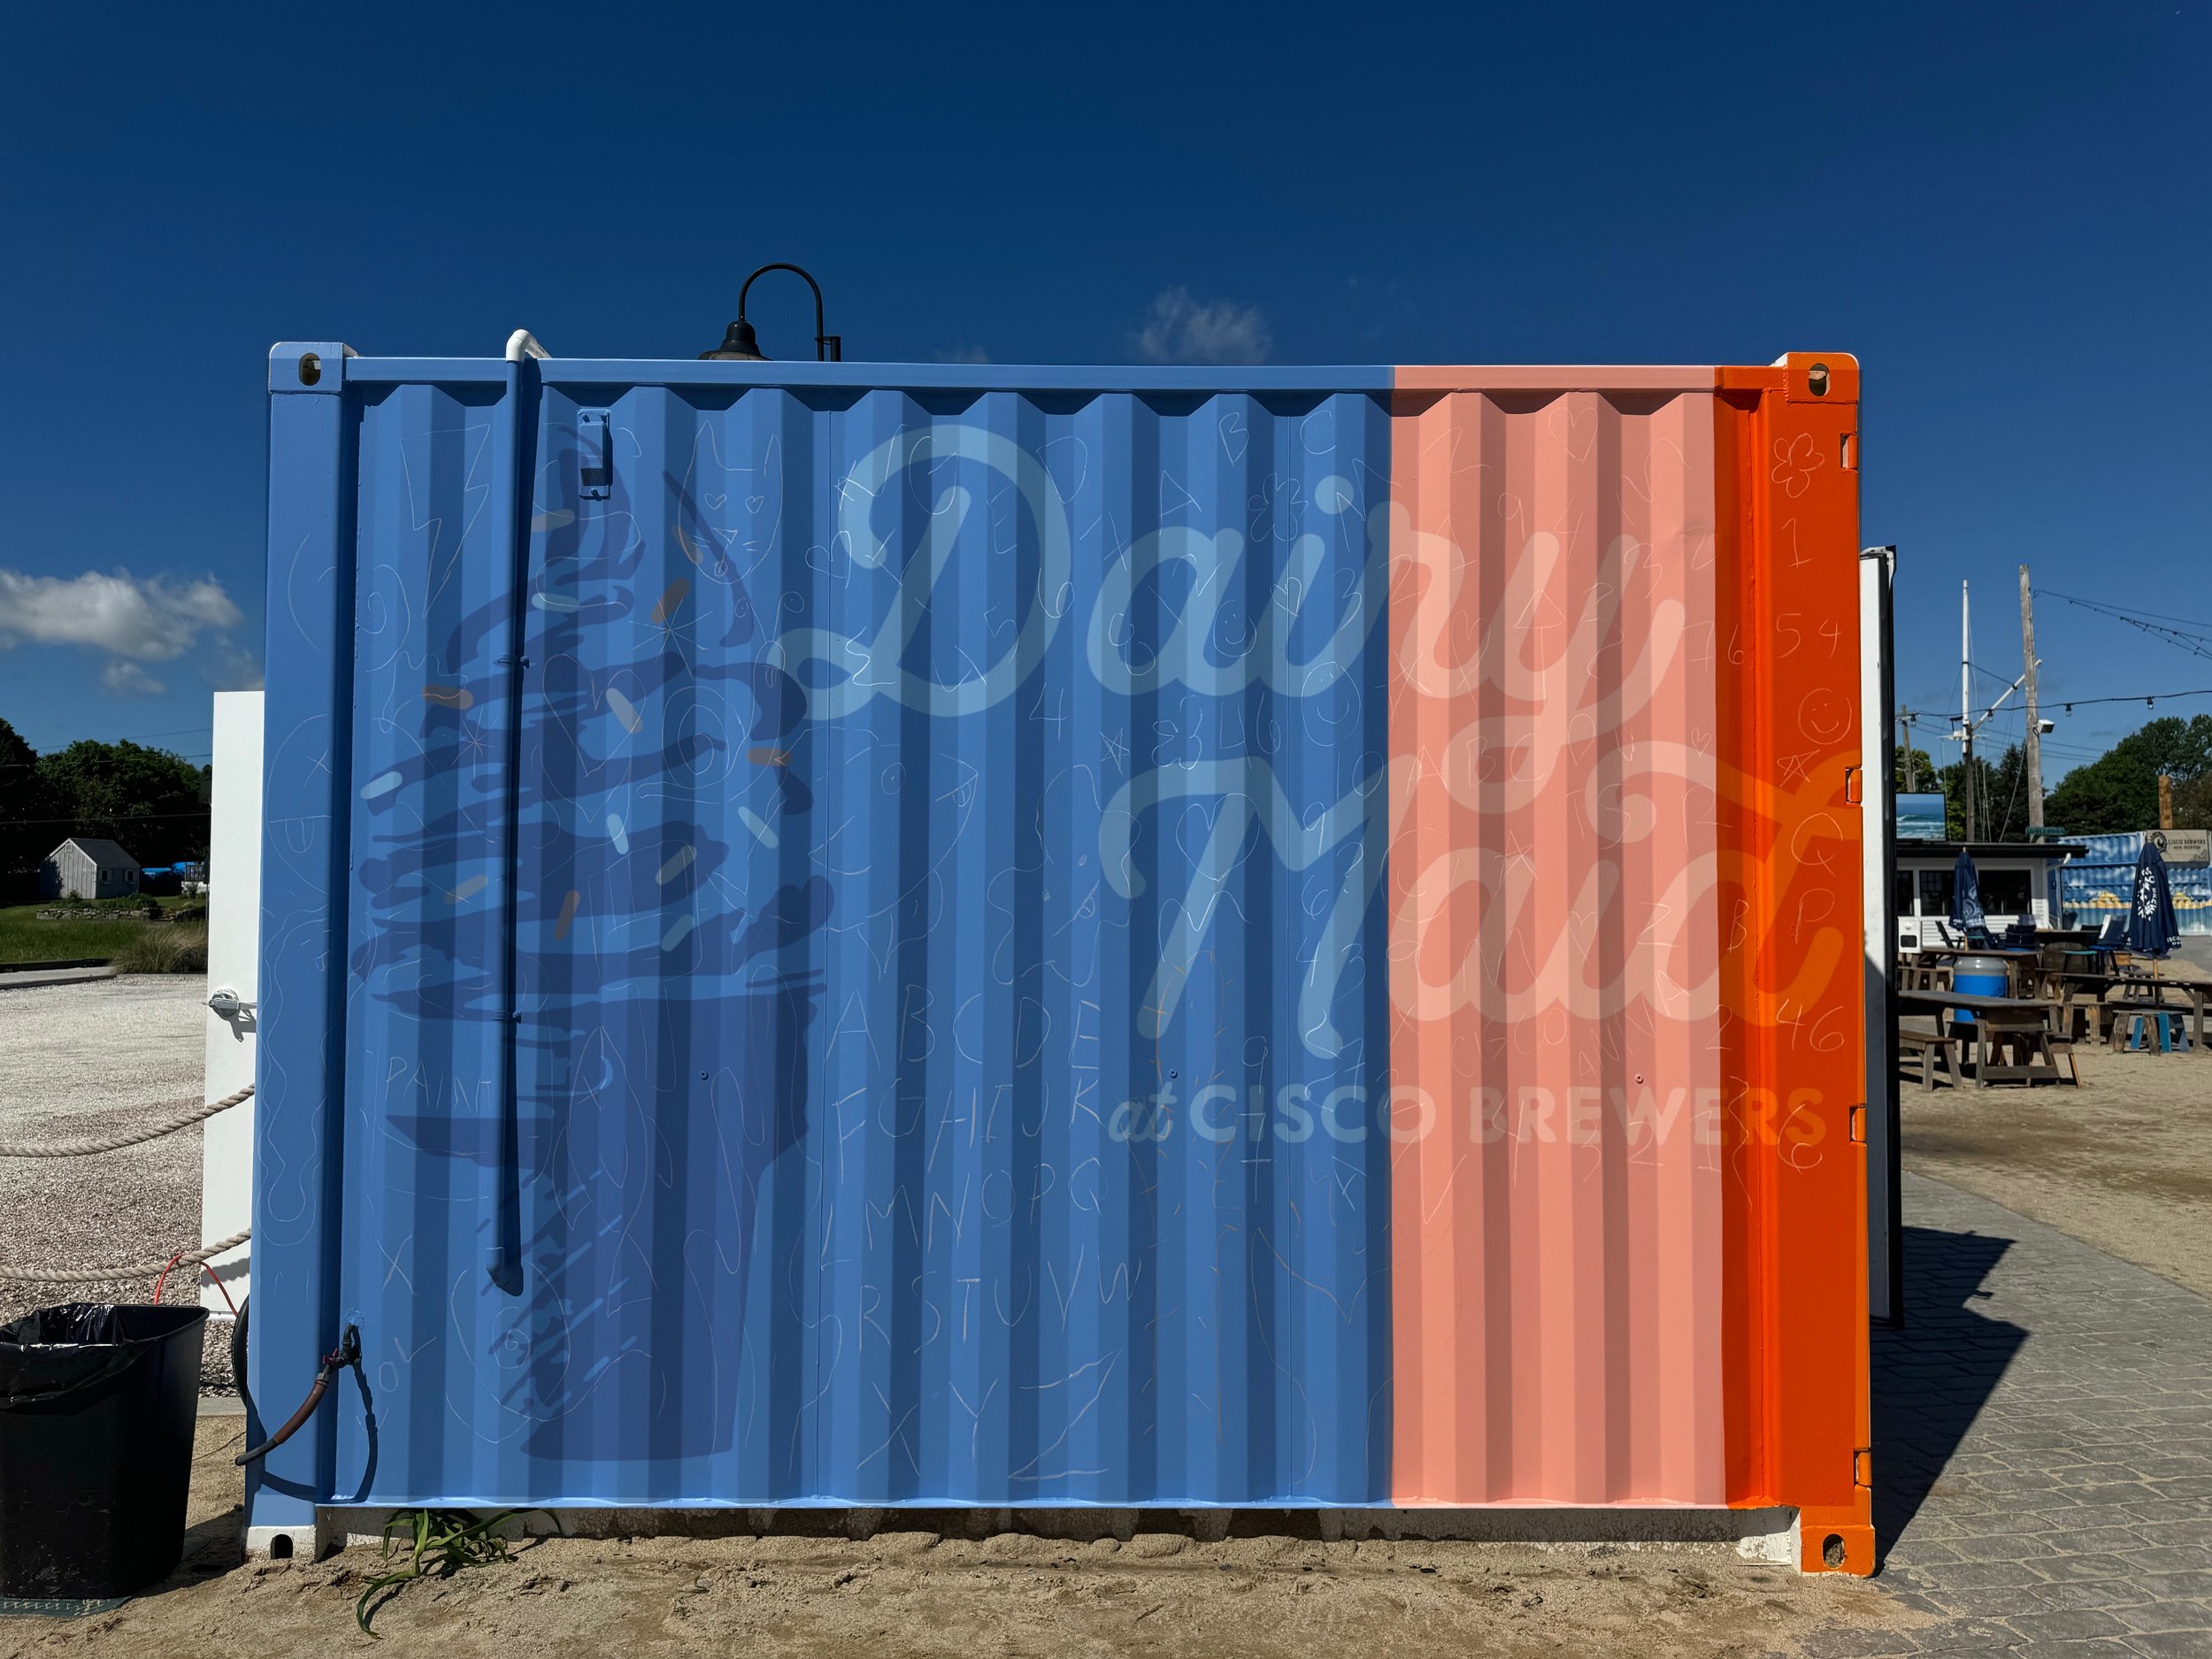

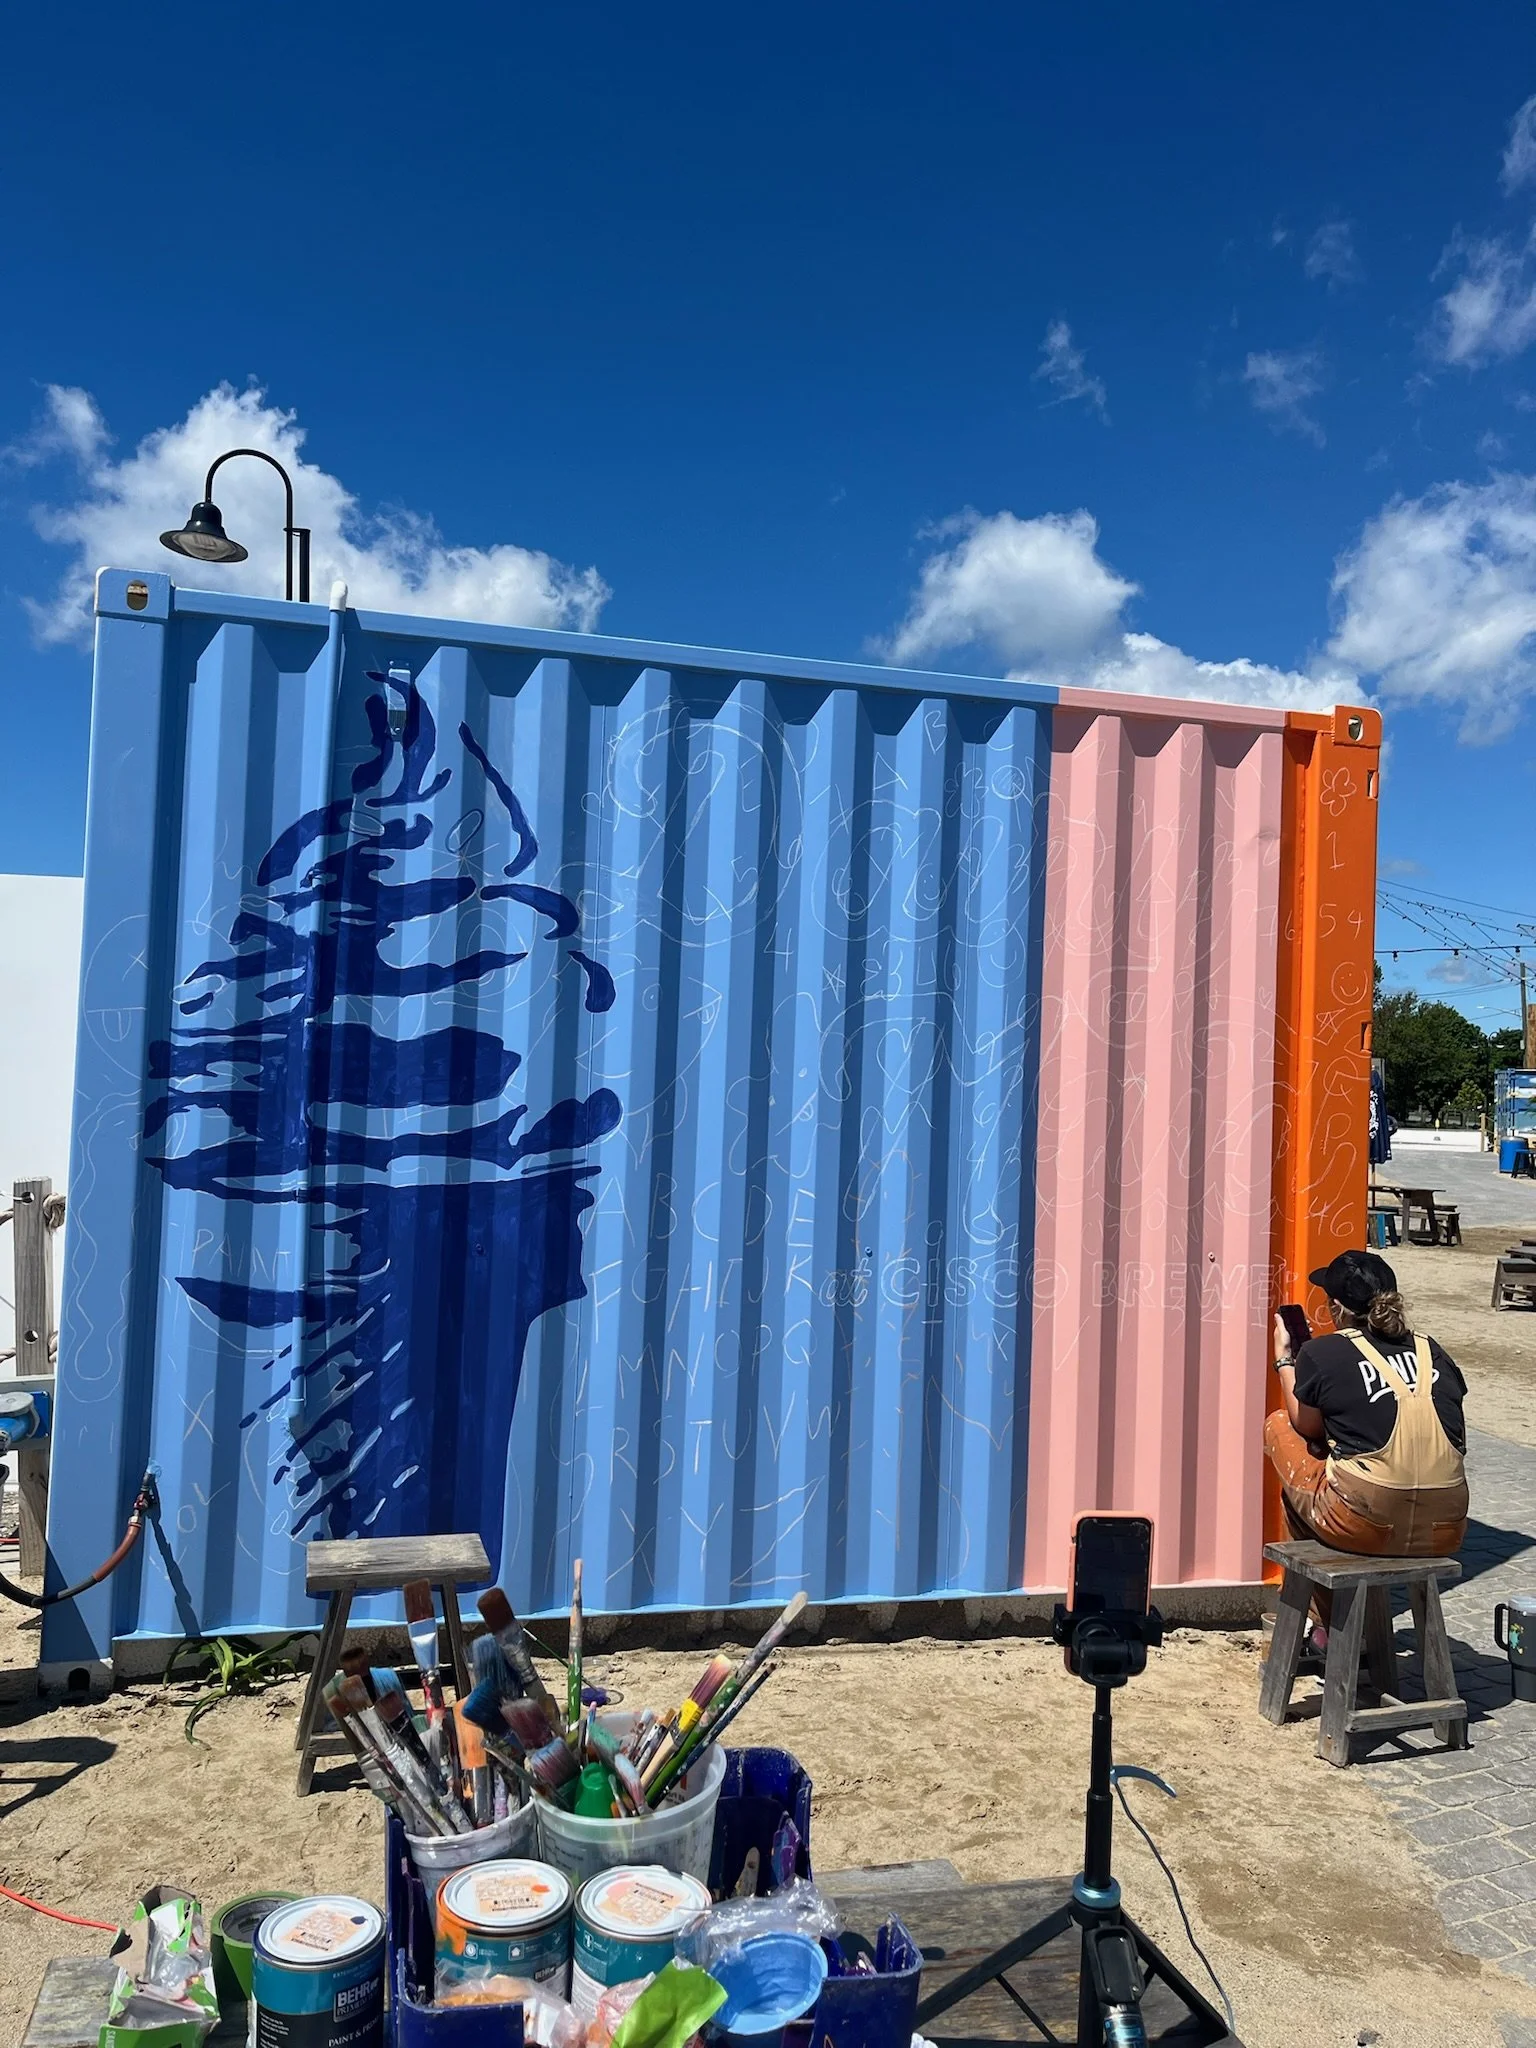
I used the doodle grid method to install a mural for Dairy Maid @ Cisco Brewers in the spring of 2024.
Six Reasons You Should Try the Doodle Grid Method on Your Next Mural
The doodle grid is a method that I come back to time and time again, for many reasons. This summer, I’m leaning into it because it's both a time and cost effective way to fore-go a projector and work in broad daylight. But, there are a lot of other benefits, too:
You can travel light: Unlike projecting your design or creating a standard grid, the doodle grid method only requires some chalk, spray paint, or anything you can mark a wall with - - no special equipment needed here.
Easily scalable: Some projectors might be capped in terms of how big or small/ how close or far they can project an image. The doodle grid method, however, is infinitely scalable! From tiny walls to sides of skyscrapers, this method will allow you to accurately scale your design, no matter the size of your backdrop.
Cost-effective: While I highly recommend all muralists eventually invest in a projector (check out my DIY Mural Supply List for my favorites!), if you are beginning your mural career and can’t yet afford the investment, the doodle grid method is going to be your best friend. Beyond the cost of basic drawing materials (which you likely already have), it’s virtually free - making it a great budget and beginner-friendly option.
Adaptable to all surfaces: Projecting onto a wall with irregular textures and uneven surfaces (i.e. brick walls, for instance), can lead to a distorted image and can make perfectly straight lines hard to do. Since getting your doodle grid up requires you to put hand to wall, you can adapt the designs to fit the contours of any surface- ensuring your design remains proportional and accurate.
No power dependency: This is a biggie - especially if you are working in a remote area, or in nature. Projectors require a power source (and if they don’t they do require a battery which could die). When you are on job sites where there is no easily accessible outlet, forget trying to deal with extension cords and just start doodling! The doodle grid method is independent of electricity, making it a reliable option for anywhere you are painting..
Allows for creative freedom: While a projector imposes the exact image you’ve designed onto a surface, the doodle grid method gives you more flexibility to make last minute tweaks and creative adjustments to the design as you install it.
Step-by-Step Instructions to Successfully usE the Doodle Grid Method on your next mural
What you’ll need:
Chalk, spray paint - basically anything you want to doodle with!
An iPad and Procreate (yes, I did say you didn’t need any special equipment for this, but you will need some sort of program like Procreate or Photoshop for mock-ups)
Okay so by now, you get the jist - random doodles all over the wall will help you grid out your mural flawlessly. But - how exactly does this work?
Let’s break it down, step-by-step.
First thing you’re going to need to do is determine the scale and dimensions of your grid. How much of your surface do you want your mural to cover? Mark out the boundaries of your mural using your frog tape or utensil of choice.
Take a step back and make sure you like the size you’ll be working with. Look good? Great - next you’re going to pick up your chalk and get to doodling! Depending on how big your surface is, you may have a hard time thinking of a million different types of doodles. I always start by going down the alphabet, then working through numbers, and by this point I’m in the zone and the stars, hearts, peace signs, and fish with buckteeth start flowing. Just have fun with it! There is no rhyme or reason to these doodles - your goal is just to cover your surface with different designs. The only rule is to use a tool that you can see well enough a few feet from the wall, but that isn’t too dark that it will be difficult to paint over.
When you’ve finished doodling all over your surface, grab your iPad, iPhone, or whatever you use to take photos , stand back and take a clear photo of your work. The photo should be as straight on as possible, and encompass the entire surface area of the wall or surface you’re painting.
Using Procreate, Photoshop, Illustrator, or whatever app you like to use for mockups, overly your mural design onto the photo of the wall.
Once you’ve centered the design on the photo so that your art is exactly where you want to paint it IRL, bring that opacity waaay down. When you can see the doodles in the photo through the elements of your design, you’re ready to start transferring your design onto the surface in front of you.
Using those doodles as a reference point, mark out your design on the wall. Keep referring to the mockup and standing back to take a big picture look at your wall to ensure things are looking as they should. However, as long as what you’re drawing on the wall is covering the doodles in the same spot they are on the mockup, there should be no issues!
Tada! Now it’s time to paint. Your design is prepped and ready to be brought to life :)
I have a lot of videos on my social pages if you’re more of a visual learner!
TLDR; the doodle grid method is a fast, cost-effective, and incredibly straight forward way to ensure your mural looks exactly the way it should once all is said and done. For all my muralists out there just starting their mural career, try the doodle grid method! You don’t have to have a fancy projector or expensive tools to feel confident booking jobs. And to my seasoned muralists who swear by their projector, if you haven’t tried prepping your wall with doodles, definitely give it a shot and make sure to drop a comment below and let me know what you think! This is one of my forever favorite ways to scale a mural, and something I’ll have in my metaphorical tool kit forever. Happy doodling!!